
Handmade cute and fashionable letter holders. Let’s make your cute envelope by hand. Easy to make. Anyone with rectangular paper or square origami can make their original envelopes by hand. I will also teach you the points to note when sending your handmade envelope as a letter holder by mail.
They want to know how to make fashionable handmade envelopes!
I will teach you how to make a cute and straightforward handmade envelope
Many people may have had the experience of missing an envelope when they needed a little letter. Except for those who often use letter cases and those who have a collection of paper products, no one keeps an envelope that they rarely use.
Envelopes are also sold at stationery stores and convenience stores, but even if you buy a new envelope, you will “absolutely make it a waste. It’s a waste!” In such a case, know how to make your handmade envelope. It’s super convenient when you’re there! This time, we will introduce a cute and straightforward handmade letter case DIY.
How to make your handmade envelope A4 paper part 1
How to push the envelope made of rectangular paper 1
A4 size paper such as copy paper is the size of paper that we are familiar with. Isn’t it easy to prepare as paper for handmade envelopes? First, let’s look at how to make envelopes that can be made by simply folding A4 size paper, such as wrapping paper and copy paper without using scissors. Only rectangular paper is used. No glue, ruler or scissors are used.
How to make an envelope made of rectangular paper 2.
I don’t have an envelope, but I have a copy paper! This is the first way to make an envelope that can be used in such cases, just by folding it without using scissors. First, place the rectangular paper vertically in front of your eyes. Fold the paper in half from bottom to top. (Photo A)
How to make an envelope made of rectangular paper 3
There are three steps, but they are all the same, so they are summarised. The method is as follows.
- Fold only the top sheet of paper in half.
- Now Fold up the paper from 2.1 to the crease you just folded
- Fold it down to the crease you just folded.
These two steps.
How to make an envelope made of rectangular paper 4
I’ve folded the upper paper, which I haven’t touched on until now, to the edge of the last folded paper. After making a crease, put this paperback in its original position.
How to make an envelope made of rectangular paper 5
Fold it up or down, and fold it up in a triangle at the position shown in Photo D to match the line below the bellows. This does the same for left and right. From here, the process of doing the same thing for the left and proper objects continues several times like this, but only one is explained.
How to make an envelope made of rectangular paper 6
Copy paper is not suitable for folding depending on the article, and it may feel rough, and hangnail or the folded corners may not be decided sharply, but it can not be helped, and it is as clean as possible. Let’s keep it to finish. If you fold it with high-quality paper, such as wrapping paper, this will not happen.
How to make an envelope made of rectangular paper 7
At this point, unfold the part that was folded from both sides and make a crease at the position of Photo F (the part where the width of the crease on the paper above is narrow).
How to make an envelope made of rectangular paper 8
It’s hard to understand because it’s pure white, but Photo G shows the central part folded up. Eventually, this part will be folded down, and the lid will be inserted, but for the next step, temporarily fold it upwards.
How to make an envelope made of rectangular paper 9
Make a crease in Photo E and fold only one of the loose parts (Photo H) inward. The lower part is a bag, so crush it into a triangle.
How to make an envelope made of rectangular paper 10
Fold the part that was temporarily raised in Photo G again, as shown in Photo I.
How to make an envelope made of rectangular paper 11
If the remaining left and right parts are also folded back with creases, it will look like Photo J. This completes the piece for inserting the envelope. After that, let’s make the lid part.
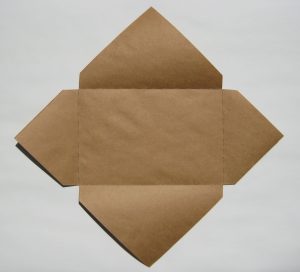
How to make an envelope made of rectangular paper 12
The lid is made by folding it diagonally. As shown in Photo K, fold the lid part to align the creases, and the angle is 45 degrees. Please do the same thing on the left and right in contrast.
How to make an envelope made of rectangular paper 13
As shown in Photo L, the excess paper with the lid folded is hidden inside by inserting it inside. The tanned line on the right side of the photo is the part with creases in Photo F. It has a streak, so you can easily fold it.
Complete!
If you lower the lid and insert it, the top will not open naturally without glueing. This completes an envelope made of rectangular paper! Next, I will introduce how to make another rectangular paper envelope.
Also read: what colours make black


